Develop A One-Of-A-Kind CSS / JS-Based Game Portfolio

Email Newsletter
Weekly tips on front-end & UX.
Trusted by 200,000+ folks.
 Register!


 Flexible CMS. Headless & API 1st
A portfolio is a must-have for any designer or developer who wants to stake their claim on the Web. It should be as unique as possible, and with a bit of HTML, CSS and JavaScript, you could have a one-of-a-kind portfolio that capably represents you to potential clients. In this article, I’ll show you how I created my 2-D Web-based game portfolio.
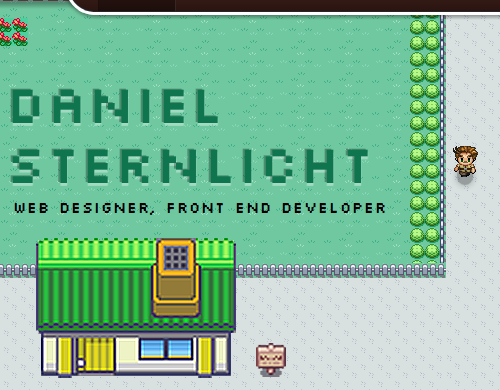
The 2-D Web-based game portfolio of Daniel Sternlicht.
Before getting down to business, let’s talk about portfolios.
A portfolio is a great tool for Web designers and developers to show off their skills. As with any project, spend some time learning to develop a portfolio and doing a little research on what’s going on in the Web design industry, so that the portfolio presents you as an up to date, innovative and inspiring person. All the while, keep in mind that going with the flow isn’t necessarily the best way to stand out from the crowd.
Further Reading on SmashingMag: Link
- Building “Topple Trump”, An Interactive Web-Based Quiz Game
- What Web Designers Can Learn From Video Games
- Email Marketing For Mobile App Creators
- How To Build A SpriteKit Game In Swift 3
One last thing before we dive into the mystery of my Web-based game portfolio. I use jQuery which has made my life much easier by speeding up development and keeping my code clean and simple.
Now, let’s get our hands dirty with some code.
The HTML
Let’s warm up with a quick overview of some very basic HTML code. It’s a bit long, I know, but let’s take it step by step.
<div id="wrapper">

    <hgroup id="myInfo">
        <h1>DANIEL STERNLICHT</h1>
        <h2>Web Designer, Front-End Developer</h2>
    </hgroup>

    <div id="startCave" class="cave"></div>
    <div id="startCaveHole" class="caveHole"></div>

    <div id="mainRoad" class="road"></div>
    <div id="leftFence"></div>
    <div id="rightFence"></div>

    <div id="daniel"></div>

    <div id="aboutRoad" class="road side"></div>
    <div id="aboutHouse" class="house">
        <div class="door"></div>
        <div class=”lightbox”>…</div>
    </div>
    <div id="aboutSign" class="sign">
        <span>About Me</span>
    </div>

    …

    …

    <div id="rightTrees" class="trees"></div>
    <div id="leftGrass" class="grass"></div>

    <div id="endSea" class="sea"></div>
    <div id="endBridge" class="bridge"></div>

    <div id="boat" class="isMoored">
        <div class="meSail"></div>
    </div>

</div>
The HTML is not very complicated, and I could have used an HTML5 canvas element for this game, but I felt more comfortable using simple HTML DOM elements.
Basically, we have the main #wrapper div, which contains the game’s elements, most of which are represented as div elements (I chose divs because they are easy to manipulate).
Have a quick look at my game. Can you detect what makes up the game view?
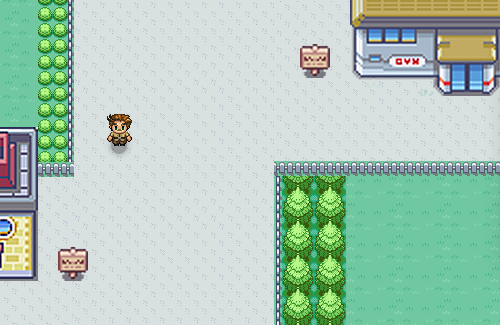
The game view
We have roads, trees, fences, water, caves, houses and so on.
Back to our HTML. You’ll find an element for each of these items, with the relevant class and ID. Which brings us to the CSS.
The CSS
First of all, note that I prepared the HTML to follow the principles of object-oriented CSS by determining global classes for styling, and not using IDs as styling hooks. For example, I used the class .road on each element that should look like a road. The CSS for the .road class would be:
.road {
   position: absolute;
   background: url(images/road.png) repeat;
}
Take trees as another example:
.trees {
   position: absolute;
   background: url(images/tree.png) repeat 0 0;
}
Note that almost all of the elements are absolutely positioned on the game’s canvas. Positioning the elements relatively would be impossible for our purposes, especially because we want the game to be as responsive as possible (within limits, of course — the minimum width that I deal with is 640 pixels). We can write a general rule giving all of the DOM elements in the game an absolute position:
#wrapper * {
   position: absolute;
}
This snippet will handle all of the child elements inside the #wrapper div, and it frees us from having to repeat code.
One more word about the CSS. The animations in the game are done with CSS3 transitions and animations, excluding certain features such the lightboxes and player “teleporting.” There are two reasons for this.
The first is that one of the purposes of this portfolio is to demonstrate innovation and up-to-date development, and what’s more innovative than using the power of CSS3?
The second reason is performance. Upon reading Richard Bradshaw’s very interesting article “Using CSS3 Transitions, Transforms and Animation,” I came to the overwhelming conclusion: use CSS3 when you can.
A great example of the power of CSS3 animations in my portfolio is the pattern of movement of the water. The CSS looks like this:
.sea {
   left: 0;
   width: 100%;
   height: 800px;
   background: url(images/sea.png) repeat 0 0;
   -webkit-animation: seamove 6s linear infinite;   /* Webkit support */
   -moz-animation: seamove 6s linear infinite;      /* Firefox support */
   animation: seamove 6s linear infinite;          /* Future browsers support */
}
And here is the code for the animation itself:
/* Webkit support */
@-webkit-keyframes seamove {
   0% {
      background-position: 0 0;
   }
   100% {
      background-position: 65px 0;
   }
}

@-moz-keyframes seamove {…}   /* Firefox support */
@-keyframes seamove {…}       /* Future browsers support */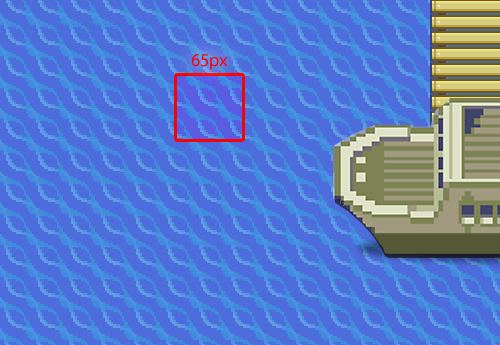
The sea PNG is marked out.
The repeating sea.png image is 65 pixels wide, so to give the sea a waving effect, we should move it by the same number of pixels. Because the background is repeating, it gives us the effect we want.
Another cool example of CSS3 animations happens when the player steps into the boat and sails off the screen.
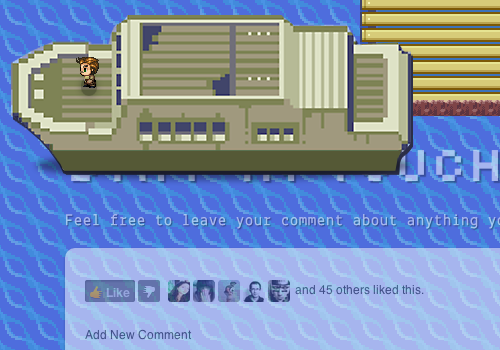
The boat sails off the screen, revealing the “Contact” section.
If the player gets back onto the road, you’ll notice that the boat moves in “reverse,” back to its original position. It sounds complicated, but you have no idea how easy it is with CSS3 transitions. All I did was capture the event with JavaScript to determine whether the user is “on board.” If the user is, then we add the class .sail to the boat element, which make it sail off; otherwise, we withhold this class. At the same time, we add a .show class to the #contact wrapper, which smoothly reveals the contact form in the water. The CSS of the boat looks like this:
#boat {
   position: absolute;
   bottom: 500px;
   left: 50%;
   margin-left: -210px;
   width: 420px;
   height: 194px;
   background: url(images/boat.png) no-repeat center;
   -webkit-transition: all 5s linear 1.5s;
   -moz-transition: all 5s linear 1.5s;
   transition: all 5s linear 1.5s;
}
When we add the class .sail to it, all I’m doing is changing its left property.
#boat.sail {
   left: -20%;
}
The same goes for the #contact wrapper with the class .show. Except here, I’m playing with the opacity property:
#contact.show {
   opacity: 1;
}
CSS3 transitions do the rest of the work.
The JavaScript
Because we are dealing with a 2-D game, we might want to base it on a JavaScript game engine, perhaps an existing framework. But the thing about frameworks (excluding jQuery, which I’m using as a base) is that they are usually good for a head start, but they probably won’t fit your needs in the long run.
A good example is the lightboxes in my portfolio, which provide information about me and are activated when the user enters a house.
An example of a lightbox in the game. (Large image)
This kind of functionality doesn’t exist in a regular JavaScript game engine. You could always improve an existing framework with your own code, but diving into someone else’s code sometimes takes longer than writing your own. Moreover, if you rewrite someone else’s code, it could become a problem when a new version is released.
After passing over libraries such as Crafty, LimeJS and Impact, which really are great game engine frameworks, I felt I had no choice but to build my own engine to fit my needs.
Let’s quickly review the main methods that I’m running in the game.
To handle the keyboard arrow events, I use the following code:
$(window).unbind('keydown').bind('keydown', function(event) {
    switch (event.keyCode) {
        event.preventDefault();
        case 37: // Move Left
            me.moveX(me.leftPos - 5, 'left');
        break;

        case 39: // Move Right
            me.moveX(me.leftPos + 5, 'right');
        break;

        case 38: // Move Up
            me.moveY(me.topPos - 5, 'up');
        break;

        case 40: // Move Down
            me.moveY(me.topPos + 5, 'down');
        break;
    }
});
As you can see, the code is very simple. When the user presses the up or down arrow, I call the moveY() function, and when they press right or left, I call moveX().
A quick peek at one of them reveals all the magic:
moveX: function(x, dir) {
    var player = this.player;
    var canMove = this.canImove(x, null);
    if(canMove){
        this.leftPos = x;
        player.animate({'left': x + 'px'}, 10);
    }
    if(dir == 'left') {
        this.startMoving('left', 2);
    }
    else {
        this.startMoving('right', 3);
    }
}
At each step the player takes, I check with a special method named canImove() (i.e. “Can I move?”) to determine whether the character may move over the game canvas. This method include screen boundaries, house positions, road limits and so on, and it gets two variables, including the x and y coordinates of where I want the player to move to. In our example, if I wanted the player to move left, I’d pass to the method their current left position plus 5 pixels. If I wanted them to move right, I’d pass its current position minus 5 pixels.
If the character “can move,” I return true, and the character keeps moving; or else, I return false, and the character remains in their current position.
Note that in the moveX() method, I’m also checking the direction in which the user wants to go, and then I call a method named startMoving():
if(dir == 'left') {
   this.startMoving('left', 2);
}
else {
   this.startMoving('right', 3);
}
You’re probably wondering how the walking effect on the character is achieved. You might have noticed that I’m using CSS sprites. But how do I activate them? It’s actually quite simple, with the help of a jQuery plugin called Spritely. This amazing plugin enables you to animate CSS sprites simply by calling the method on the relevant element and passing it your properties (such as the number of frames).
Back to our startMoving() method:
startMoving: function(dir, state) {
   player.addClass(dir);
   player.sprite({fps: 9, no_of_frames: 3}).spState(state);
}
I simply add a direction class to the player element (which sets the relevant sprite image), and then call the sprite() method from Spritely’s API.
Because we are dealing with the Web, I figured that being able to move with the keyboard arrows would not be enough. You always have to think of the user, your client, who might not have time to hang out in your world. That is why I added both a navigation bar and an option to “teleport” the character to a given point in the game — again, using the canImove() method to check whether the player may move to this point.
Next we’ve got the lightboxes. Recall what the HTML looks like for each house:
<div id="aboutHouse" class="house">
   <div class="door"></div>
   <div class="lightbox">
      <div class="inner about">
         Lightbox content goes here…
      </div>
   </div>
</div>
Did you notice the .lightbox class in the house div? We will use it later. What I basically did was define a “hot spot” for each house. When the player gets to one of those hot spots, the JavaScript activates the lightboxInit(elm) method, which also gets the relevant house’s ID. This method is very simple:
lightboxInit:  function(elm) {
   // Get the relevant content
   var content = $(elm).find('.lightbox').html();

   // Create the lightbox
   $('<div id="dark"></div>').appendTo('body').fadeIn();
   $('<div id="lightbox">' + content + '<span id="closeLB">x</span></div>').insertAfter("#dark").delay(1000).fadeIn();
}
First, I get the relevant content by finding the div.lightbox child of the house element. Then, I create and fade in a blank div, named dark, which gives me the dark background. Finally, I create another div, fill it up with the content (which I had already stored in a variable), and insert it right after the dark background. Clicking the “x” will call another method that fades out the lightbox and removes it from the DOM.
One good practice that I unfortunately learned the hard way is to keep the code as dynamic as possible. Write your code in such a way that if you add more content to the portfolio in future, the code will support it.
Conclusion
As you can see, developing a 2-D Web-based game is fun and not too complicated a task at all. But before rushing to develop your own game portfolio, consider that it doesn’t suit everyone. If your users don’t have any idea what HTML5 is or why IE 5.5 isn’t the “best browser ever,” then your effort will be a waste of time, and perhaps this kind of portfolio would alienate them. Which is bad.
Nevertheless, I learned a lot from this development process and I highly recommend, whatever kind of portfolio you choose, that you invest a few days in developing your own one of a kind portfolio.


