Taming Advanced CSS Selectors

Email Newsletter
Weekly tips on front-end & UX.
Trusted by 200,000+ folks.


 Flexible CMS. Headless & API 1st
The best way to avoid these plagues spreading in your markup and keep it clean and semantic, is by using more complex CSS selectors, ones that can target specific elements without the need of a class or an id, and by doing that keep our code and our stylesheets flexible.
CSS Specificity
Before delving into the realms of advanced CSS selectors, it’s important to understand how CSS specificity works, so that we know how to properly use our selectors and to avoid us spending hours debugging for a CSS issue that could be easily fixed if we had only payed attention to the specificity.
When we are writing our CSS we have to keep in mind that some selectors will rank higher than others in the cascade, the latest selector that we wrote will not always override the previous ones that we wrote for the same elements.
So how do you calculate the specificity of a particular selector? It’s fairly straightforward if you take into account that specificity will be represented as four numbers separated by commas, like: 1, 1, 1, 1 or 0, 2, 0, 1
- The first digit (a) is always zero, unless there is a style attribute applied to that element within the markup itself
- The second digit (b) is the sum of the number of IDs in that selector
- The third digit © is the sum of other attribute selectors and pseudo-classes in that selector. Classes (
.example) and attribute selectors (eg.li[id=red])are included here. - The fourth digit (d) counts the elements (like
table,p,div, etc.) and pseudo-elements (like:first-line) - The universal selector (*) has a specificity of zero
- If two selectors have the same specificity, the one that comes last on the stylesheet will be applied
Let’s take a look at a few examples, to make it easier to understand:
#sidebar h2— 0, 1, 0, 1h2.title— 0, 0, 1, 1h2 + p— 0, 0, 0, 2#sidebar p:first-line— 0, 1, 0, 2
From the following selectors, the first one is the one who will be applied to the element, because it has the higher specificity:
#sidebar p#first { color: red; }— 0, 2, 0, 1#sidebar p:first-line { color: blue; }— 0, 1, 0, 2
It’s important to have at least a basic understanding of how specificity works, but tools like Firebug are useful to let us know which selector is being applied to a particular element by listing all the CSS selectors in order of their specificity when you are inspecting an element.
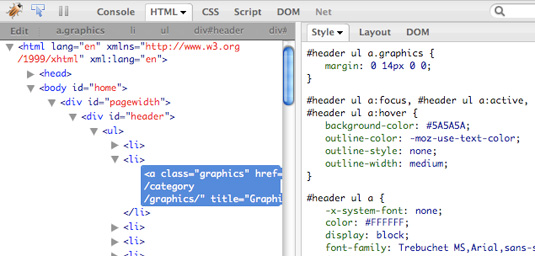
Firebug lets you easily see which selector is being applied to an element.
Useful links:
- CSS Specificity: Things You Should Know
- Link Specificity¯MeyerWeb
- CSS: Specificity Wars
- Assigning property values, Cascading, and Inheritance—W3C
1. Attribute selectors
Attribute selectors let you target an element based on its attributes. You can specify the element’s attribute only, so all the elements that have that attribute — whatever the value — within the HTML will be targeted, or be more specific and target elements that have particular values on their attributes — and this is where attribute selectors show their power.
There are 6 different types of attribute selectors:
[att=value]
The attribute has to have the exact value specified.[att~=value]
The attribute’s value needs to be a whitespace separated list of words (for example, class=“title featured home”), and one of the words is exactly the specified value.[att|=value]
The attribute’s value is exactly “value” or starts with the word “value” and is immediately followed by “-”, so it would be “value-”.[att^=value]
The attribute’s value starts with the specified value.[att$=value]
The attribute’s value ends with the specified value.[att*=value]
The attribute’s value contains the specified value.
For example, if you want to change the background color of all the div elements that are posts on your blog, you can use the attribute selector that targets every div whose class attribute starts with “post”:
div[class*="post"] {
  background-color: #333;
  }
This will match all the div elements whose class attribute contains the words “post” in any position.
Another useful usage of attribute selectors is to target different types of input elements. For example, if you want your text inputs to have a different width from the others, you can use a simple attribute selector:
input[type="text"] {
  width: 200px;
  }
This will target all the input elements whose type attribute is exactly “text”.
Now let’s say you want to add a different icon next to each different type of file your website is linking to, so your website’s visitors know when they’ll get an image, a PDF file, a Word document, etc. This can be done by using an attribute selector:
a[href$=".jpg"] {
  background: url(jpeg.gif) no-repeat left 50%;
  padding: 2px 0 2px 20px;
  }

a[href$=".pdf"] {
  background: url(pdf.gif) no-repeat left 50%;
  padding: 2px 0 2px 20px;
  }

a[href$=".doc"] {
  background: url(word.gif) no-repeat left 50%;
  padding: 2px 0 2px 20px;
  }
In this example, we’ve used an attribute selector that will target all the links (a) whose href attribute ends ($) with .jpg, .pdf or .doc.
Notes on browser support Apart from Internet Explorer 6, all major browsers support attribute selectors. This means that when you are using attribute selectors on your stylesheets, you should make sure that IE6 users will still be provided with a usable site. Take our third example: adding an icon to your links adds another level of usability to your site, but the site will still be usable if the links don’t show any icons.
2. Child selector
The child selector is represented by the sign “>”. It allows you to target elements that are direct children of a particular element.
For example, if you want to match all the h2 elements that are a direct child of your sidebar div, but not the h2 elements that may be also within the div, but that are grandchildren (or later descendants) of your element, you can use this selector:
div#sidebar > h2 {
  font-size: 20px;
  }
You can also use both child and descendant selectors combined. For example, if you want to target only the blockquote elements that are within divs that are direct grandchildren of the body element (you may want to match blockquotes inside the main content div, but not if they are outside it):
body > div > div blockquote {
  margin-left: 30px;
  }
Notes on browser support Like the attribute selectors, the child selector is not supported by Internet Explorer 6. If the effect you are trying to achieve by using it is crucial for the website’s usability or overall aesthetics, you can consider using a class selector with it, or on a IE-only stylesheet, but that would detract from the purpose of using child selectors.
3. Sibling combinators
There are two types of sibling combinators: adjancent sibling combinators and general sibling combinators.
Adjacent sibling combinator
This selector uses the plus sign, “+”, to combine two sequences of simple selectors. The elements in the selector have the same parent, and the second one must come immediately after the first.
The adjacent sibling combinator can be very useful, for example, when dealing with text. Lets say you want to add a top margin to all the h2 tags that follow a paragraph (you don’t need to add a top margin if the heading comes after an h1 tag or if it’s the first element on that page):
p + h2 {
  margin-top: 10px;
  }
You can be even more specific and say that you only want this rule applied if the elements are within a particular div:
div.post p + h2 {
  margin-top: 10px;
  }
Or you can add another level of complexity: say you want the first line of the paragraphs of every page to be in small caps.
.post h1 + p:first-line {
  font-variant: small-caps;
  }
Because you know that the first paragraph of every post immediately follows an h1 tag, you can refer to the h1 on your selector.
General sibling combinator
The general sibling combinator works pretty much the same as the adjacent sibling combinator, but with the difference that the second selector doesn’t have to immediately follow the first one.
So if you need to target all the p tags that are within a particular div and that follow the h1 tag (you may want those p tags to be larger than the ones that come before the title of your post), you can use this selector:
.post h1 ~ p {
  font-size: 13px;
  }
Notes on browser support Internet Explorer 6 doesn’t understand sibling combinators, but, as for the other cases, if your audience includes a small percentage of IE6 users, and if the website’s layout isn’t broken or severely affected by its lack of support, this is a much easier way of achieving lots of cool effects without the need of cluttering your HTML with useless classes and ids.
4. Pseudo-Classes
Dynamic pseudo-classes
These are called dynamic pseudo-classes because they actually do not exist within the HTML: they are only present when the user is or has interacted with the website.
There are two types of dynamic pseudo-classes: link and user action ones. The link are :link and :visited, while the user action ones are :hover, :active and :focus.
From all the CSS selectors mentioned in this post, these will probably be the ones that are most commonly used.
The :link pseudo-class applies to links that haven’t been visited by the user, while the :visited pseudo-class applies to links that have been visited, so they are mutually exclusive.
The :hover pseudo-class applies when the user moves the cursor over the element, without having to activate or click on it. The :active pseudo-class applies when the user actually clicks on the element. And finally the :focus pseudo-class applies when that element is on focus — the most common application is on form elements.
You can use more than one user action dynamic pseudo-class in your stylesheets, so you can have, for example, a different background color for an input field depending on whether the user’s cursor is only hovering over it or hovering over it while in focus:
input:focus {
  background: #D2D2D2;
  border: 1px solid #5E5E5E;
  }

input:focus:hover {
  background: #C7C7C7;
  }
Notes on browser support
The dynamic pseudo-classes are supported by all modern browsers, even IE6. But bear in mind that IE6 only allows the :hover pseudo-class to be applied to link elements (a) and only IE8 accepts the :active state on elements other than links.
:first-child
The :first-child pseudo-class allows you to target an element that is the first child of another element. For example, if you want to add a top margin to the first li element of your unordered lists, you can have this:
ul > li:first-child {
  margin-top: 10px;
  }
Let’s take another example: you want all your h2 tags in your sidebar to have a top margin, to separate them from whatever comes before them, but the first one doesn’t need a margin. You can use the following code:
#sidebar > h2 {
  margin-top: 10px;
  }

#sidebar > h2:first-child {
  margin-top: 0;
  }
Notes on browser support
IE6 doesn’t support the :first-child pseudo-class. Depending on the design that the pseudo-class is being applied to, it may not be a major cause for concern. For example, if you are using the :first-child selector to remove top or bottom margins from headings or paragraphs, your layout will probably not break in IE6, it will only look sightly different. But if you are using the :first-child selector to remove left and right margins from, for example, a floated sequence of divs, that may cause more disruption to your designs.
The language pseudo-class
The language pseudo-class, :lang(), allows you to match an element based on its language.
For example, lets say you want a specific link on your site to have a different background color, depending on that page’s language:
:lang(en) > a#flag {
  background-image: url(english.gif);
  }

:lang(fr) > a#flag {
  background-image: url(french.gif);
  }
The selectors will match that particular link if the page’s language is either equal to “en” or “fr” or if it starts with “en” or “fr” and is immediately followed by an “-”.
Notes on browser support Not surprisingly, the only version of Internet Explorer that supports this selector is 8. All other major browsers support the language pseudo-selector.
5. CSS 3 Pseudo-classes
:target
When you’re using links with fragment identifiers (for example, https://www.smashingmagazine.com/2009/08/02/bauhaus-ninety-years-of-inspiration/#comments, where “#comments” is the fragment identifier), you can style the target by using the :target pseudo-class.
For example, lets imagine you have a long page with lots of text and h2 headings, and there is an index of those headings at the top of the page. It will be much easier for the user if, when clicking on a particular link within the index, that heading would become highlighted in some way, when the page scrolls down. Easy:
h2:target {
  background: #F2EBD6;
  }
Notes on browser support
This time, Internet Explorer is really annoying and has no support at all for the :target pseudo-class. Another glitch is that Opera doesn’t support this selector when using the back and forward buttons. Other than that, it has support from the other major browsers.
The UI element states pseudo-classes
Some HTML elements have an enable or disabled state (for example, input fields) and checked or unchecked states (radio buttons and checkboxes). These states can be targeted by the :enabled, :disabled or :checked pseudo-classes, respectively.
So you can say that any input that is disabled should have a light grey background and dotted border:
input:disabled {
  border:1px dotted #999;
  background:#F2F2F2;
  }
You can also say that all checkboxes that are checked should have a left margin (to be easily seen within a long list of checkboxes):
input[type=”checkbox”]:checked {
  margin-left: 15px;
  }
Notes on browser support All major browsers, except our usual suspect, Internet Explorer, support the UI element states pseudo-classes. If you consider that you are only adding an extra level of detail and improved usability to your visitors, this can still be an option.
6. CSS 3 Structural Pseudo-Classes
:nth-child
The :nth-child() pseudo-class allows you to target one or more specific children of a parent element.
You can target a single child, by defining its value as an integer:
ul li:nth-child(3) {
  color: red;
  }
This will turn the text on the third li item within the ul element red. Bear in mind that if a different element is inside the ul (not a li), it will also be counted as its child.
You can target a parent’s children using expressions. For example, the following expression will match every third li element starting from the fourth:
ul li:nth-child(3n+4) {
  color: yellow;
  }
In the previous case, the first yellow li element will be the fourth. If you just want to start counting from the first li element, you can use a simpler expression:
ul li:nth-child(3n) {
  color: yellow;
  }
In this case, the first yellow li element will be the third, and every other third after it. Now imagine you want to target only the first four li elements within the list:
ul li:nth-child(-n+4) {
  color: green;
  }
The value of :nth-child can also be defined as “even” or “odd”, which are the same as using “2n” (every second child) or “2n+1” (every second child starting from the first), respectively.
:nth-last-child
The :nth-last-child pseudo-class works basically as the :nth-child pseudo-class, but it starts counting the elements from the last one.
Using one of the examples above:
ul li:nth-child(-n+4) {
  color: green;
  }
Instead of matching the first four li elements in the list, this selector will match the last four elements.
You can also use the values “even” or “odd”, with the difference that in this case they will count the children starting from the last one:
ul li:nth-last-child(odd) {
  color: grey;
  }
:nth-of-type
The :nth-of-type pseudo-class works just like the :nth-child, with the difference that it only counts children that match the element in the selector.
This can be very useful if we want to target elements that may contain different elements within them. For example, let’s imagine we want to turn every second paragraph in a block of text blue, but we want to ignore other elements such as images or quotations:
p:nth-of-type(even) {
  color: blue;
  }
You can use the same values as you would use for the :nth-child pseudo-class.
:nth-last-of-type
You guessed it! The :nth-last-of-type pseudo-class can be used exactly like the aforementioned :nth-last-child, but this time, it will only target the elements that match our selector:
ul li:nth-last-of-type(-n+4) {
  color: green;
  }
We can be even more clever, and combine more than one of these pseudo-classes together on a massive selector. Let’s say all images within a post div to be floated left, except for the first and last one (let’s image these would full width, so they shouldn’t be floated):
.post img:nth-of-type(n+2):nth-last-of-type(n+2) {
  float: left;
  }
So in the first part of this selector, we are targeting every image starting from the second one. In the second part, we are targeting every image except for the last one. Because the selectors aren’t mutually exclusive, we can use them both on one selector thus excluding both the first and last element at once!
:last-child
The :last-child pseudo-class works just as the :first-child pseudo-class, but instead targets the last child of a parent element.
Let’s image you don’t want the last paragraph within your post div to have a bottom margin:
.post > p:last-child {
  margin-bottom: 0;
  }
This selector will target the last paragraph that is a direct and the last child of an element with the class of “post”.
:first-of-type and :last-of-type
The :first-of-type pseudo-class is used to target an element that is the first of its type within its parent.
For example, you can target the first paragraph that is a direct child of a particular div, and capitalize its first line:
.post > p:first-of-type:first-line {
  font-variant: small-caps;
  }
With this selector you make sure that you are targeting only paragraphs that are direct children of the “post” div, and that are the first to match our p element.
The :last-of-type pseudo-class works exactly the same, but targets the last child of its type instead.
:only-child
The :only-child pseudo-class represents an element that is the only child of its parent.
Let’s say you have several boxes (“news”) with paragraphs of text inside them. When you have more than one paragraph, you want the text to be smaller than when you have only one:
div.news > p {
  font-size: 1.2em;
  }

div.news > p:only-child {
  font-size: 1.5em;
  }
In the first selector, we are defining the overall size of the p elements that are direct children of a “news” div. On the second one, we are overriding the previous font-size by saying, if the p element is the only child of the “news” div, its font size should be bigger.
:only-of-type
The :only-of-type pseudo-class represents an element that is the only child of its parent with the same element.
How can this be useful? Image you have a sequence of posts, each one represented by a div with the class of “post”. Some of them have more than one image, but others have only one image. You want the image within the later ones to be aligned to the center, while the images on posts with more than one image to be floated. That would be quite easy to accomplish with this selector:
.post > img {
  float: left;
  }

.post > img:only-of-type {
  float: none;
  margin: auto;
  }
:empty
The :empty pseudo-class represents an element that has no content within it.
It can be useful in a number of ways. For example, if you have multiple boxes in your “sidebar” div, but don’t want the empty ones to appear on the page:
#sidebar .box:empty {
  display: none;
  }
Beware that even if there is a single space in the “box” div, it will not be treated as empty by the CSS, and therefore will not match the selector.
Notes on browser support Internet Explorer (up until version 8) has no support for structural pseudo-classes. Firefox, Safari and Opera support these pseudo-classes on their latest releases. This means that if what it’s being accomplished with these selectors is fundamental for the website’s usability and accessibility, or if the larger part of the website’s audience is using IE and you don’t want to deprive them of some design details, it’s be wise to keep using regular classes and simpler selectors to cater for those browsers. If not, you can just go crazy!
7. The negation pseudo-class
The negation pseudo-class, :not(), lets you target elements that do not match the selector that is represented by its argument.
For example, this can be useful if you need to style all the input elements within a form, but you don’t want your input elements with the type submit to be styled — you want them to be styled in a different way —, to look more like buttons:
input:not([type="submit"]) {
  width: 200px;
  padding: 3px;
  border: 1px solid #000000;
  }
Another example: you want all the paragraphs within your post div to have a larger font-size, except for the one that indicates the time and date:
.post p:not(.date) {
  font-size: 13px;
  }
Can you image the number of possibilities this selector brings with it, and the amount of useless selectors you could strip out off your CSS files were it widely supported?
Notes on browser support Internet Explorer is our usual party pooper here: no support at all, not even on IE8. This probably means that this selector will still have to wait a while before some developers lose the fear of adding them to their stylesheets.
8. Pseudo-elements
Pseudo-elements allow you to access elements that don’t actually exist in the HTML, like the first line of a text block or its first letter.
Pseudo-elements exist in CSS 2.1, but the CSS 3 specifications state that they should be used with the double colon “::”, to distinguish them from pseudo-classes. In CSS 2.1, they are used with only one colon, “:”. Browsers should be able accept both formats, except in the case of pseudo-elements that may be introduced only in CSS 3.
::first-line
The ::first-line pseudo-element will match the first line of a block, inline-block, table-caption or table-cell level element.
This is particularly useful to add subtle typographical details to your text blocks, like, for example, transforming the first line of an article into small caps:
h1 + p::first-line {
  font-variant: small-caps;
  }
If you’ve been paying attention, you’ll know that this means the paragraph that comes immediately after an h1 tag (“+”) should have its first line in small caps.
You could also refer to the first line of a particular div, without having to refer to the actual paragraph tag:
div.post p::first-line { font-variant: small-caps; }Or go one step farther and target specifically the first paragraph within a particular div:
div.post > p:first-child::first-line {
  font-variant: small-caps;
  }
Here, the “>” symbol indicates that you are targeting a direct child the post div, so if the paragraph were to be inside a second div, it wouldn’t match this selector.
::first-letter
The ::first-letter pseudo-element will match the first letter of a block, unless it’s preceded by some other content, like an image, on the same line.
Like the ::first-line pseudo-element, ::first-letter is commonly used to add typographical details to text elements, like drop caps or initials.
Here is how you could use the ::first-letter pseudo-element to create a drop cap:
p {
  font-size: 12px;
  }

p::first-letter {
  font-size: 24px;
  float: left;
  }
Bear in mind that if you use both ::first-line and ::first-letter in the same element, the ::first-letter properties will override the same properties inherited from ::first-line.
This element can sometimes produce unexpected results, if you’re not aware of the W3C specs: it’s actually the CSS selector with the longest spec! So it’s a good idea to read them carefully if you’re planning on using it (as it is for all the other selectors).
::before and ::after
The ::before and ::after pseudo-elements are used to insert content before or after an element’s content, purely via CSS.
These elements will inherit many of the properties of the elements that they are being attached to.
Image you want to the words “Graphic number x:” before the descriptions of graphs and charts on your page. You could achieve this without having to write the words “Graphic number”, or the number itself yourself:
.post {
  counter-reset: image;
  }

p.description::before {
  content: "Figure number " counter(image) ": ";
  counter-increment: image;
  }
What just happened here?
First, we tell the HTML to create the “image” counter. We could have added this property to the body of the page, for example. Also, we can call this counter whatever name we want to, as long as we always reference it by the same name: try it for yourself!
Then we say that we want to add, before every paragraph with the class “description”, this piece of content: “Figure number ” — notice that only what we wrote between quotes will be created on the page, so we need to add the spaces as well!
After that, we have counter(image): this will pick up the property we’ve already defined in the .post selector. It will by default start with the number one (1).
The next property is there so that the counter knows that for each p.description, it needs to increment the image counter by 1 (counter-increment: image).
It’s not as complicated as it looks, and it can be quite useful.
The ::before and ::after pseudo-elements are often only used with the content property, to add small sentences or typographical elements, but here it’s shown how we can use it in a more powerful way in conjunction with the counter-reset and counter-increment properties.
Fun fact: the ::first-line and ::first-letter pseudo-elements will match the content added by the ::before pseudo-element, if present.
Notes on browser support
These pseudo-elements are supported by IE8 (not IE7 or 6), if the single colon format is used (for example, :first-letter, not ::first-letter). All the other major browsers support these selectors.
CSS Selectors Conclusion
Enough with the boring talk, now it’s time for you to grab the information on this post and go try it for yourself: start by creating an experimental page and test all of these selectors, come back here when in doubt and make sure to always refer to the W3C specs, but don’t just sit there thinking that because these selectors aren’t yet widely supported you might as well ignore them.
If you’re a bit more adventurous, or if you’re not afraid of letting go of the past filled with useless and non-semantic classes and ids, why not sneak one or two of these powerful CSS selectors into your next project? We promise you’ll never look back.
References
- CSS 2 Selectors — W3C
- CSS 3 Selectors Level 3 — W3C
- Comparison of layout engines (Cascading Style Sheets) — Wikipedia
- Generated content, automatic numbering, and lists — W3C
Further Resources
- Keeping Your Elements’ Kids in Line with Offspring — A List Apart
- Selectutorial - CSS selectors
- CSS 2.1 selectors, Part 1 and Part 2
- CSS 3 selectors explained
- CSS selectors and pseudo selectors browser compatibility
- 10 Useful CSS Properties Not Supported By Internet Explorer
- Styling a Poem with Advanced CSS Selectors
You may also want to take a look at the following related posts:
- Semantic CSS With Intelligent Selectors
- CSS Specificity And Inheritance
- CSS Specificity: Things You Should Know
- CSS Inheritance, The Cascade And Global Scope


